If you watch this on your phone, I guess you'll have to turn it sideways...
Saturday, May 30, 2020

Thursday, May 28, 2020
A New Project!
It's time for the faithful old Ford tractor I've been using to go back to her rightful owner. I've had her for nearly five years, nursed her through some hard times and enjoyed a lot of good times too. Without that tractor, Sábado would be a very different place.
I was mentioning this to my good neighbor Rick, the rancher up the road who has so many old tractors on his place that he has never counted them. I asked him if he had anything that might work for me, and he told me he had taken another old Ford in trade for some work he did for a guy.
One thing led to another, and I am now the proud owner of a 1954 Ford Tractor. I paid almost exactly what the tractor cost originally 66 years ago. If you want to know how much that was, you'll have to look it up. 😊
Here she sits in Rick's yard, looking kind of forlorn and in need of some love.


One of the main things restorers look for is completeness. Are all the parts there? Doesn't matter too much what kind of shape they're in, as long as they're there. This one is pretty complete. That missing gauge, along with just about any other part I might need will be readily available from vintage tractor suppliers.
It even comes with a three-way box grader. The box can be rotated to have ripping shanks plow the dirt, a scoop blade to dig and move dirt, and the blade can be rotated backwards as a drag to smooth out the dirt. I used that a lot on the other tractor to smooth out the drive after rain.

The first thing on my list was to get rid of the front loader apparatus. I rarely used the loader on the other tractor, and it's just heavy and in the way. These were for farmers who had piles of manure or grain or other soft stuff to pick up and move. It's not much good for earth moving, and so far, I have no piles of manure to move...

The loader weighs 850 pounds, so it wasn't coming off with a pair of pliers. This picture was taken after several sweaty hours disconnecting it at the front. It's held on with several large rusty bolts that can only be accessed while standing on your head or crawling in the dirt, and on top of that, some previous owner had welded the mounting plate to the tractor! Thanks a lot, farmer!
I had to use a sawzall and metal cutting blade to cut through some quarter-inch steel, but I gott'er done eventually. The part that's welded to the tractor will have to be dealt with at a later date.
In the above picture I was taking the weight off of the back so I could knock out two large pins that attach the loader at the rear.
Once everything was disconnected, I needed to raise it way up to clear the front wheels as I backed the tractor out. Luckily I still have the other tractor, and in this case, its loader came in mighty handy.

All Clear!

What a difference. That loader is now a permanent part of my landscape, tucked discretely away in a corner where it will live forever, unless some fool wants to buy it, but he'll have to replace some parts.
I had to remove some of the sheet metal parts to get to the loader mounts, but those will go back on and then I will start tinkering with things.
My Dream is that someday she'll look like this!

Watch this space. But don't be in a hurry...
I was mentioning this to my good neighbor Rick, the rancher up the road who has so many old tractors on his place that he has never counted them. I asked him if he had anything that might work for me, and he told me he had taken another old Ford in trade for some work he did for a guy.
One thing led to another, and I am now the proud owner of a 1954 Ford Tractor. I paid almost exactly what the tractor cost originally 66 years ago. If you want to know how much that was, you'll have to look it up. 😊
Here she sits in Rick's yard, looking kind of forlorn and in need of some love.


One of the main things restorers look for is completeness. Are all the parts there? Doesn't matter too much what kind of shape they're in, as long as they're there. This one is pretty complete. That missing gauge, along with just about any other part I might need will be readily available from vintage tractor suppliers.
It even comes with a three-way box grader. The box can be rotated to have ripping shanks plow the dirt, a scoop blade to dig and move dirt, and the blade can be rotated backwards as a drag to smooth out the dirt. I used that a lot on the other tractor to smooth out the drive after rain.
 |
| Missing a few teeth, but those can be bought. |
My friend Andy does a lot of work at Rick's place and he had been tinkering with this one. He stopped by the other day and said he had it running good and asked if I'd like to come drive it a bit, since I had already bought it.
It was indeed running well and in fact my little test drive turned out to be all the way home, a bit over a mile on the county road. Andy followed in my truck with the flashers going.
Here she is. My very own tractor. Doesn't look like much now, but I once had a travel trailer that looked pretty sad, and that turned out okay...


The loader weighs 850 pounds, so it wasn't coming off with a pair of pliers. This picture was taken after several sweaty hours disconnecting it at the front. It's held on with several large rusty bolts that can only be accessed while standing on your head or crawling in the dirt, and on top of that, some previous owner had welded the mounting plate to the tractor! Thanks a lot, farmer!
I had to use a sawzall and metal cutting blade to cut through some quarter-inch steel, but I gott'er done eventually. The part that's welded to the tractor will have to be dealt with at a later date.
In the above picture I was taking the weight off of the back so I could knock out two large pins that attach the loader at the rear.
Once everything was disconnected, I needed to raise it way up to clear the front wheels as I backed the tractor out. Luckily I still have the other tractor, and in this case, its loader came in mighty handy.

All Clear!

What a difference. That loader is now a permanent part of my landscape, tucked discretely away in a corner where it will live forever, unless some fool wants to buy it, but he'll have to replace some parts.
I had to remove some of the sheet metal parts to get to the loader mounts, but those will go back on and then I will start tinkering with things.
My Dream is that someday she'll look like this!

Watch this space. But don't be in a hurry...
Wednesday, May 13, 2020
Monday, May 11, 2020
Product Endorsement
I know it's pretty hyperbolic to say a product can change your life, but life can be changed in some small and oh-so-happy ways.
This post is about never cleaning your oven again, and wiping down the stovetop with a damp rag.
Told you... small but mighty.
Here it is. Available on Amazon.

These things are teflon-coated fiberglass and you just lay one down in the bottom of your oven. In a gas oven like mine, you put it on the bottom rack. In an electric oven, you put it under the heating element.
Cook whatever you want, let it boil over and drip hot cheese or other gooey stuff. Make a mess in that oven. Let it burn on. But instead of donning your rubber gloves, putting on your goggles and respirator, and spraying toxic chemicals, just pull out the sheet, drop it in the sink and rinse it with water. That's it.
I never need cleaning products of any kind, not even vinegar; just a damp cloth. You don't even have to dry the sheet if you don't want to.

Luckily for me, I was able to remove my stovetop burners, lay down a sheet, and reinstall the burners. The stovetop was a bigger problem for me than the oven, because the white porcelain gets splattered almost every time I cook something, and that was a real pain in the patoot to clean.
This post is about never cleaning your oven again, and wiping down the stovetop with a damp rag.
Told you... small but mighty.
Here it is. Available on Amazon.

These things are teflon-coated fiberglass and you just lay one down in the bottom of your oven. In a gas oven like mine, you put it on the bottom rack. In an electric oven, you put it under the heating element.
Cook whatever you want, let it boil over and drip hot cheese or other gooey stuff. Make a mess in that oven. Let it burn on. But instead of donning your rubber gloves, putting on your goggles and respirator, and spraying toxic chemicals, just pull out the sheet, drop it in the sink and rinse it with water. That's it.
 |
| After cooking pizza. This is only a little mess, but size doesn't matter. (Or so I've been told.) |
I never need cleaning products of any kind, not even vinegar; just a damp cloth. You don't even have to dry the sheet if you don't want to.

 |
| After a quick wipe-down in the sink. |
Luckily for me, I was able to remove my stovetop burners, lay down a sheet, and reinstall the burners. The stovetop was a bigger problem for me than the oven, because the white porcelain gets splattered almost every time I cook something, and that was a real pain in the patoot to clean.
No more. Damp cloth. I'm not kidding.
 |
| Your situation may vary. |
So that's my little product endorsement. Unfortunately I don't make any money off of it.
But if it changes one life...
Sunday, April 19, 2020
Special Delivery
Now that my (almost daily) delivery drivers can't pull up right in front of the porch, they have to get out of the truck and trudge up my stone path, rain or shine. Since I have this Amazon monkey on my back, I'm starting to feel sorry for the poor folks who are forced to support my habit.

To make their lives a little easier (and to give me something fun to build), I worked up a design for a package mailbox that they could reach right from the truck.


Because it will be out in the weather I decided to make it out of construction lumber, specifically rough-sawn 1x4s available from my local lumberyard.
I made the boards into tongue-and-groove, complete with a little bead detail. Tongue-and-groove boards support each other and allow for expansion and contraction. Important for wood that will live outside.

Screws are in the center of each board, so the board can easily expand and contract, and I used spacers to make sure they all had breathing room.


 |
| These planks can swell and shrink all they want without buckling. |
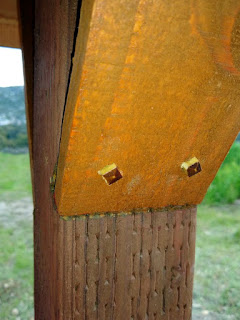
Diagonal bracing is notched into the post and held in place with what boatbuilders used to call "trunnels" (tree nails) - wooden pegs, round(ish) for most of their length to be driven into a drilled hole, and left square on the outer end to bite into the wood like the head of a nail.
 |
The pegs are dry and the post is green, so when the green wood dries out and shrinks, it will clamp down on the peg and never let go. Old-timers built chairs this way; inserting dry stretchers into holes drilled in green parts. The older the chair, the tighter the grip on the inserted peg.
|


The mail lady, who doesn't have to bring my packages all the way up to my house, but always has, is named Rosa. So the rose is kind of in her honor.

Saturday, April 11, 2020
Planting Day

It finally stopped raining, and as the farmers say, I could finally get in the field. It's been raining all week but this ground is so well-drained that what was a swamp yesterday was dry today. At least on the surface. Digging was easy and it's a good thing, because I planted 31 plants today!
They don't look like much now, but most of these native plants are supposed to grow to 6 - 8 feet.
 |
| This was yesterday, when my future patio became a swimming pool |
 |
| Rocks to the left of me... |
 |
| Rocks to the right. |


I had spread fescue grass seed on the front part of the yard before the rain. Hopefully it didn't all get washed out into the driveway. After I got the plants in and the new stepping stones laid, I seeded right up to the house.

Obviously I still have erosion, but hopefully once the grass and plants get established, the situation will improve.

Couple more to plant tomorrow, and then we water and wait!
Tuesday, March 31, 2020
Putting the Hard in Hardscape
 |
| My colorized version of the landscape plan |
As I mentioned in my last post, I have this landscape plan now, and it calls for lots of pretty plants, and I also have 12 pounds of native grass seed to spread. Around the house will be a nice fescue that can be left long or mowed, and the rest will be a native erosion-control blend. Neither should require much water once established.
I want to get as much of the tractor work done as I can before I start planting, so I don't tear everything up. Here's where we are so far:
First thing, adios upper driveway. I don't need it, and being uphill, it was causing a lot of my erosion problems. So I plowed it under. If I have any grass seed left, I'll sprinkle some, but the native weeds will eventually fill it in.

Next, I dug out a space for a paving-stone patio.

The stones were on sale, so I ordered them now before the price goes up. Not sure how soon I'll get around to all the knee-crawling this job will involve...

Installed the boulders in two groups. They are dug into the ground to make them look more natural and also to avoid hidey-holes for Mr. Snake. One group on each side of the house.


The rocks are actually kind of cool. They're crystalline white, and some even have lichens (or something) growing on them. They must be native to this area, because they came from an outcropping on the property right next door.
Curiously though, there are zero rocks on my entire five acres. Not even little ones. I think the glacier came through here and wiped the place clean.

One thing I did find after grading the driveway was a leftover from a previous user of this land: barbed wire. There are some posts sticking out of the ground down near the road that an old-timer told me were part of a cattle loading ramp.

Yesterday was the day that put the hard in hardscape. I had graded a path from the house to the shop and set up some bender board, and by yesterday things had dried out enough to start putting the dirt back in.

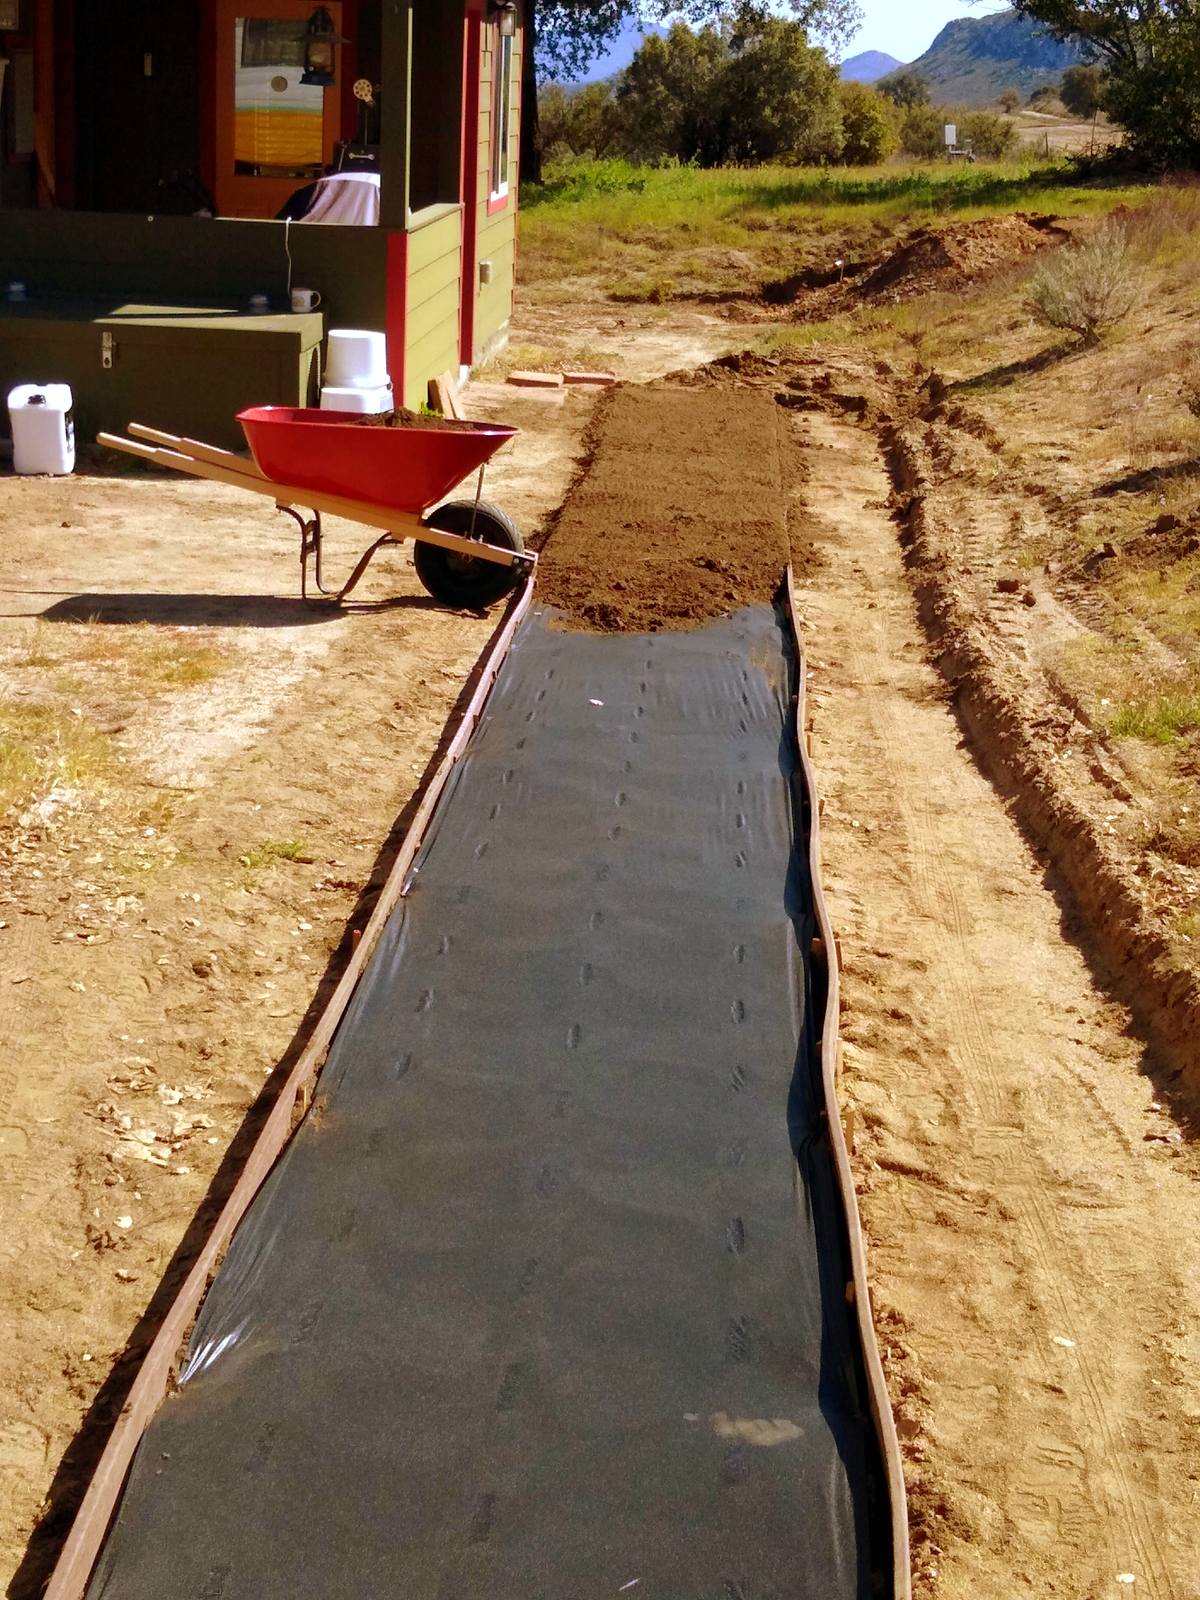
I had hoped to use the tractor for this job, but it didn't turn out to be practical, so it was one wheelbarrow at a time. This is as far as I got yesterday. Once the path is done, I'll also need to put back the dirt on both sides of it.

 |
| Dirt glue, AKA pathway stabilizer |
I want delivery drivers to start going around the oak tree instead of just pulling up in front of the house, so the next job yesterday was trimming the low-hanging branches so even the big UPS truck can get around without scraping his roof.

Once the tree was trimmed, I took a few more passes around it with the tractor, then staked off the driveway. The area between the tape and the house will be grass and plantings.

And Just in case drivers were confused by the tape...

This morning, I raked the large area in front of the house and spread the first of the grass seed. I have three long hoses hooked up to I can hand water a couple times a day until the seeds are set.

Life goes on in the mean time. I'm still working on the ship model case in the shop, batteries need attending to every month...


And just to keep us on our toes, the heavens provided a little late-season snow a couple days ago. Today it was in the 70s. Go figure.

I'm not letting a little case of quarantine slow me down. I'm having fun, and I hope you are too. Stay home and do some of those projects you've been putting off.
Remember,

Subscribe to:
Posts (Atom)